Since I first thought of creating this site I wanted to set up an SSL certificate and to use HTTPS by default. Enabling HTTPS on your website enhances the security of your users in several ways:
- Confidentiality: The messages between the clients (web browsers) and the web server are encrypted so no third party can read them.
- Integrity: Not only the messages are secret, but they also have integrity protections, so no one can modify them or inject messages in the conversation between your browser and the server.
- Authenticity: There’s another word for this. Trust. SSL provides a way for your browser to verify the identity the web server and trust it by using the so called SSL certificates.
Let’s take a look on SSL/TLS so we can add some light to how this is done:
SSL/TLS
SSL and TLS are cryptographic protocols that aim to provide privacy and integrity of communications. SSL is the predecessor of TLS but sometimes they are both called SSL. The goals of the TLS protocol are:
- Cryptographic security: Secure communications between two parties
- Interoperability: Applications using TLS built by different programmers should be able to exchange cryptographic messages.
- Extensibility: TLS is a framework into which other methods can be incorporated. This means tat other protocols, like HTTP, can be used on top of TLS.
- Relative efficiency: TLS tries to minimize CPU use, given that cryptographic operations tend to be highly CPU intensive.
How SSL Certificates work
Ok, so you can connect securely to an HTTP server using TLS (HTTPS) but you need a way to verify that the messages that you receive come in fact, from said server, and you’re not receiveing/sending messages from/to someone else. The server will have a private/public key pair, so it can sign a message and you can verify the signature. But how do you trust the public key that the server is handing to you? It could be handed by a man-in-the-middle attacker!
This is where the SSL certificate, and the Certificate Authorities (CA) play their role. You need a trusted Certificate Authority to sign the certificate of your web server if you want browsers to trust your public key (AKA show the green lock next to your URL). So basically, a SSL certificate proves the ownership of the public key. The key is signed by someone your browser trusts (CA), and therefore, it trusts the key as well. The CA is the responsible of verifying that the public key belongs to the owner of the domain, in order to sign it.
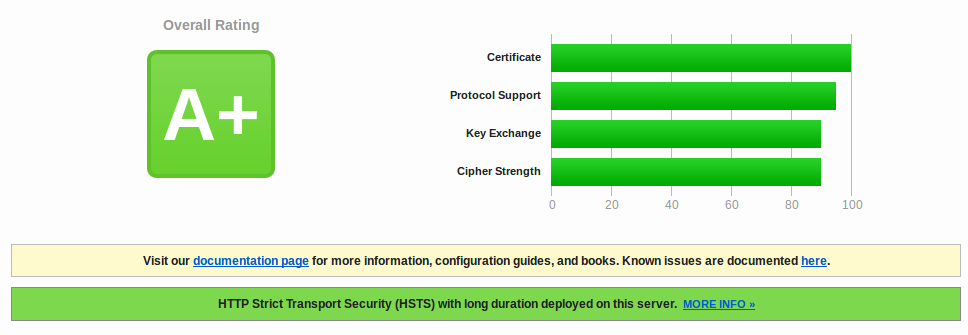
I decided to use Let’s Encrypt, a free and automated CA created by the ISRG. Next, I’ll show you how I generated and installed my Let’s Encrypt certificate on an NGINX server, and how I configured it to get an A+ rating on the Qualys SSL Server test.
Setting up the certificate with NGINX on Debian Jessie
Let’s Encrypt issues its certificates using the ACME protocol. This protocol allows a server to obtain a browser-trusted SSL certificate without human intervention. You can see how it’s done here.
So, the next thing I need is an ACME client that interacts with Let’s Encrypt server, in order to generate the certificate. I’ve chosen to use Certbot, because it’s the one recommended by Let’s Encrypt. If Certbot does not fit your needs, there are many more ACME clients.
1. Installing certbot
First, I needed to enable the Jessie Backports repository by adding the following line to /etc/apt/sources.list.
deb http://ftp.debian.org/debian jessie-backports main
Backports are recompiled packages from testing (mostly) and unstable (in a few cases only, e.g. security updates) in a stable environment so that they will run without new libraries (whenever it is possible) on a Debian stable distribution.
In order to install certbot
$ sudo apt-get install certbot -t jessie-backports
And we have successfully installed the client.
2. Obtaining a valid certificate
For the most part, next steps have been done following this and this.
There are many ways to obtain a valid SSL certificate with certbot. I’ve used the Webroot plugin. This plugin places a special file under the ./well-known directory in the root directory of your web server.
- Certbot generates a key pair, then sends the public key to the Let’s Encrypt server and says something like “I’m the ACME agent of the domain yourdomain.com and this is my key. Challenge me!”.
- Let’s Encrypt sends a nonce to certbot.
- Certbot signs the nonce with the private key and places it under the ./well-known directory. Then it notifies Let’s Encrtypt again.
- The CA then downloads the signed nonce placed in the public directory and verifies the signature.
- If the signature is valid, then certbot is authorized to do the certificate management. The key pair becomes “authorized” and then it can send certificate management messages to Let’s Encrypt.
- Then, certbot proceeds to ask the CA to issue a valid certificate for the domains it has proved ownership. This is done by generating a Certificate Signing Request (CSR). Certbot generates a new key pair. The CSR contains information about the domain, the recently generated public key and a signature with the associated private key. Certbot signs the CSR with its authorized private key and sends it to the CA.
- The CA then verifies the signatures. If everything is ok, it issues a new certificate for the domain with the public key that was contained in the CSR.
Let’s see how to do this: In order to let certbot access ./well-known, you have to modify your nginx configuration file, usually under /etc/nginx/sites-available/default. Find the server block, and add the following lines between its brackets:
location ~ /.well-known {
    allow all;
}
You can test your changes with
$ sudo nginx -t
and restart nginx to load the new configuration
$ sudo service nginx restart
Now you are ready to obtain your SSL certificate!
$ certbot certonly --webroot -w /var/www/example -d yoursite.com -d www.yoursite.com -w /var/www/thing -d thing.is -d m.thing.is
In the example above, you will obtain a unique SSL certificate for yoursite.com, www.yoursite.com, thing.is and m.thing.is. It’s very intuitive, you use -w to point where the root directory of your site is and -d to point out the domains and subdomains used by the site. The webroot plugin will generate a challenge in each of the root deractories to check the ownership of the domains.
3. Server configuration
After executing certbot as described above, the following files have been generated under /etc/letsencrypt/live/yoursite.com:
- cert.pem: The domain’s certificate
- chain.pem: The Let’s Encrypt chain certificate
- fullchain.pem: cert.pem and chain.pem combined
- privkey.pem: The certificate’s private key
Once we have obtained the certificate we need to properly configure the server to use it. First, let’s install openSSL
sudo apt-get install openssl
Not only we want to use TLS, but we want to do it the right way. First, we should generate strong Diffie-Hellman parameters. Why? take a look. This can be done using the following command:
sudo openssl dhparam -out /etc/ssl/certs/dhparam.pem 2048
Next, we will configure nginx to:
- Use these parameters
- Use strong ciphers only, ensuring Perfect Forward Secrecy.
- Use only TLS, not allowing SSLv3.
- Use Strict Transport Security.
Again, we look for the server block in the nginx configuration file, and replace these lines:
listen 80 default_server;
listen [::]:80 default_server ipv6only=on;
with
listen 443 ssl; # SSL/TLS port

server_name yoursite.com www.yoursite.com; # REPLACE WITH YOUR DOMAINS

###
# SSL Settings
###

# Certificate and key
ssl_certificate /etc/letsencrypt/live/yoursite.com/fullchain.pem;
ssl_certificate_key /etc/letsencrypt/live/yoursite.com/privkey.pem;

# Protect your users by not using SSLv3 and previous protocols
ssl_protocols TLSv1 TLSv1.1 TLSv1.2;

# WeakDH project recommended configuration for the supported ciphers
ssl_prefer_server_ciphers on;
ssl_ciphers 'ECDHE-RSA-AES128-GCM-SHA256:ECDHE-ECDSA-AES128-GCM-SHA256:ECDHE-RSA-AES256-GCM-SHA384:ECDHE-ECDSA-AES256-GCM-SHA384:DHE-RSA-AES128-GCM-SHA256:DHE-DSS-AES128-GCM-SHA256:kEDH+AESGCM:ECDHE-RSA-AES128-SHA256:ECDHE-ECDSA-AES128-SHA256:ECDHE-RSA-AES128-SHA:ECDHE-ECDSA-AES128-SHA:ECDHE-RSA-AES256-SHA384:ECDHE-ECDSA-AES256-SHA384:ECDHE-RSA-AES256-SHA:ECDHE-ECDSA-AES256-SHA:DHE-RSA-AES128-SHA256:DHE-RSA-AES128-SHA:DHE-DSS-AES128-SHA256:DHE-RSA-AES256-SHA256:DHE-DSS-AES256-SHA:DHE-RSA-AES256-SHA:AES128-GCM-SHA256:AES256-GCM-SHA384:AES128-SHA256:AES256-SHA256:AES128-SHA:AES256-SHA:AES:CAMELLIA:!DES-CBC3-SHA:!aNULL:!eNULL:!EXPORT:!DES:!RC4:!MD5:!PSK:!aECDH:!EDH-DSS-DES-CBC3-SHA:!EDH-RSA-DES-CBC3-SHA:!KRB5-DES-CBC3-SHA';

# Use strong DH parameters
ssl_dhparam /etc/ssl/certs/dhparam.pem;

# Other optimizations
ssl_session_cache   shared:SSL:10m;
ssl_session_timeout 1h;
ssl_stapling on;
ssl_stapling_verify on;

# Tell your clients that your site ONLY suports HTTPS
add_header Strict-Transport-Security "max-age=31536000; includeSubDomains" always;
If you want to learn more about how to properly configure TLS in NGNIX I recommend you to read this article.
Finally, in order to redirect port 80 to port 443, we add another server block with the following lines:
server {
    listen 80;
    server_name yoursite.com www.yoursite.com;
    return 301 https://$host$request_uri;
}
We can now test the syntax errors
$ sudo nginx -t
and then restart the server to load the new configuration:
$ sudo service nginx restart
Now you can test it! Visit https://www.ssllabs.com/ssltest/ and you’ll be able to see if you have properly configured your server.
4. Automated renewal
There’s a very simple command to renew a Letsencrypt certficate:
certbot renew
If you run this command, certbot will attept to renew every SSL certificate. But if the certificate is due in more than 30 days, it will return this message:
Cert not yet due for renewal

The following certs are not due for renewal yet:
  /etc/letsencrypt/live/yoursite.com/fullchain.pem (skipped)
  No renewals were attempted.
If the certificate is due in less than 30 days, then it will renew it for 90 more days. I have created a cronjob that will try to renew the certficates every two weeks at 3 AM and then another one that will reload the nginx configuration 5 minutes later.
First I hit
$ sudo crontab -e
Then I add
0 3 1,15 * * /usr/bin/certbot renew >> /var/log/letsencrypt-renew.log
5 3 1,15 * * /etc/init.d/nginx reload
And there it is. A properly configured (A+) HTTPS web server with a SSL certificate that will be atuomatically renewed.
Further reading: